

VW Passat Headlight Bulb Replacement: DIY Guide
Table of Contents
- VW Passat Headlight Bulb Size Chart by Year
- Tools Needed for VW Headlight Replacement
- Step 1: Access the Headlight Assembly
- Step 2: Remove the Dust Cover and Retaining Clip
- Step 3: Install the New Headlight Bulb
- Post-Installation Alignment and Troubleshooting Bulb-Out Warnings
- Frequently Asked Questions
Last Updated: September 28, 2026
VW Passat Headlight Bulb Size Chart by Year
A VW Passat headlight bulb replacement guide starts with one crucial step: confirming the exact bulb your car uses. The wrong bulb means a wasted trip and a dashboard warning light that won't clear.
Passat bulb types changed across generations, and trim levels add another wrinkle. Here's the breakdown:
| Passat Generation | Years | Low Beam (Dipped) | High Beam |
|---|---|---|---|
| B5 / B5.5 | 1998-2005 | H7 | H7 |
| B6 | 2006-2010 | H7 | H7 |
| B7 | 2011-2015 | H7 | H7 |
| NMS (North American) | 2012-2019 | H7 | H7 |
| B8 | 2020+ | H7 or LED | H7 or LED |
Most halogen-equipped Passats run H7 bulbs in both dipped and high beam positions. Higher trims with factory LED headlamps or HID xenon setups use sealed units that you replace as a whole assembly.
Check your owner's manual or the sticker inside the fuse box cover before buying.
Tools Needed for VW Headlight Replacement
You don't need a full shop to swap a Passat headlight bulb. A small set of tools covers nearly every generation.
Gather these before you start:
- Replacement H7 bulb (or correct type for your trim)
- Clean nitrile or latex gloves
- Flathead screwdriver
- Torx T20 and T25 bits
- 10mm socket and ratchet
- Trim removal tool
- Flashlight or headlamp
- Microfiber cloth
Step 1: Access the Headlight Assembly
Access is where most guides fall apart, because the procedure changes meaningfully between generations. Treat the following as four separate jobs, not one. Confirm your chassis code first, it's on the data sticker in the spare tire well or the owner's manual, then follow only your row.
B5 and B5.5 (1998-2005)
The rear of the housing is reachable from the engine bay without removing the bumper.
- Open the hood and locate the round rubber dust cap on the back of each housing.
- On the driver side, the windshield washer reservoir neck and the battery may crowd the space, the battery box on some trims must be loosened with a 10mm socket and slid aside.
- On the passenger side, the airbox intake snorkel is usually the obstruction; loosen the clamp and tilt it up.
- No bumper removal is required for bulb service on this generation.
B6 (2006-2010)
The B6 is the first generation where many owners give up and pull the bumper. You usually don't have to for a bulb, but you do need small hands or a mirror.
- Driver side: remove the plastic battery cover, then the battery hold-down with a 10mm socket, and slide the battery toward the firewall. This buys roughly 3 inches of clearance.
- Passenger side: unclip the washer fluid filler neck and move it aside.
- The dust cap is a hard plastic twist-off rather than rubber on most B6 trims.
- If you cannot get a hand behind the housing, the fallback is the wheel-well route described below.
B7 (2011-2015) and NMS (2012-2019)
These two share the wheel-well access method for the low beam on many trims.
- Turn the steering wheel fully to the opposite side so the wheel-well liner opens up.
- Remove the fender liner fasteners, typically three to five Torx T25 screws plus one or two plastic push-pins.
- Peel the liner back and reach up to the rear of the housing.
- The high beam on most NMS trims is still reachable from the top of the engine bay.
- Full bumper removal is not required for bulb replacement on these generations, despite what some forum threads imply.
B8 (2020 and newer)
Halogen-equipped B8 trims follow the wheel-well method above. Factory LED and HID B8 headlamps are sealed assemblies, there is no user-serviceable bulb, and the correct repair is module or assembly replacement. Do not attempt to pry open a sealed LED housing; you will destroy the moisture seal and the lamp will fog permanently.
When bumper removal is actually required
Bumper removal is only necessary when you are replacing the entire headlight housing, not the bulb. If you reach that point:
- Remove the front bumper cover fasteners along the top edge (typically Torx T25) and inside each front wheel well (typically T20 and T25).
- Disconnect any fog light and parking sensor connectors before pulling the cover forward.
- Support the cover with a second person or a padded stand, it is wider than it looks and scratches easily.
Battery disconnection
Disconnect the negative terminal with a 10mm wrench before touching any electrical connector. This prevents a short across the bulb circuit and protects the body control module. Reconnect it only after the new bulb, connector, and dust cover are all fully seated.
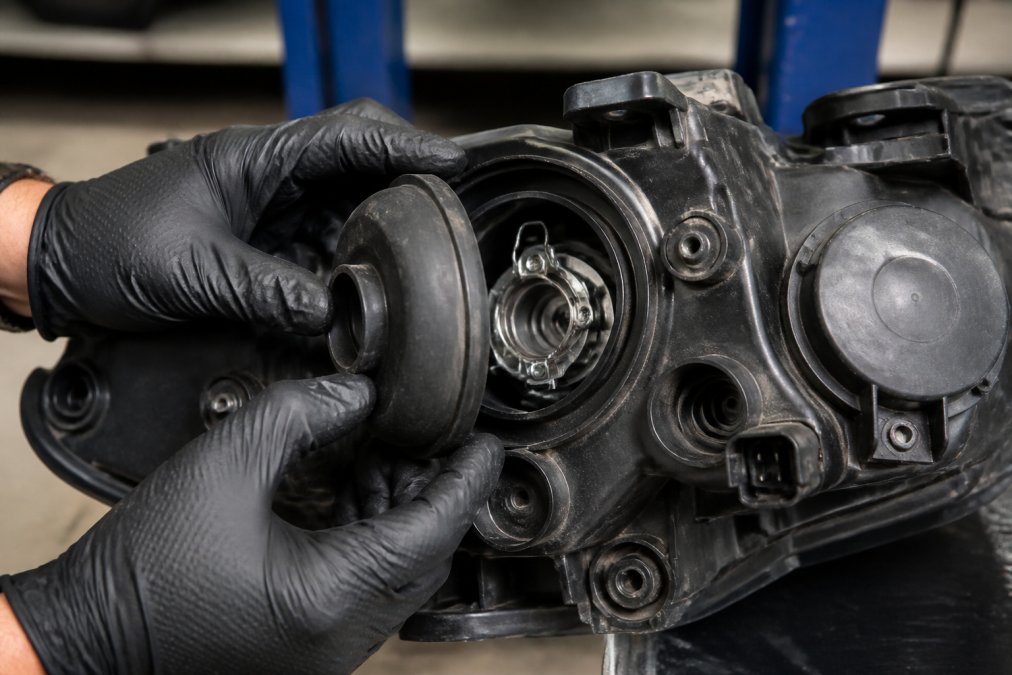
Step 2: Remove the Dust Cover and Retaining Clip
With the assembly accessible, the dust cover is your next obstacle. This rubber or plastic cap seals the back of the housing against moisture and road grime.
Step 3: Install the New Headlight Bulb
Installation reverses the removal, but small details decide whether the job lasts.
- Put on fresh gloves before touching the new bulb.
- Line up the bulb's locating tab with the notch in the socket.
- Seat the bulb fully, then close the retaining clip.
- Reconnect the electrical connector until it clicks.
- Refit the dust cover and twist clockwise to lock.
- Reconnect the battery and test both beams.
Post-Installation Alignment and Troubleshooting Bulb-Out Warnings
This is the section most guides skip, and it is the reason a 30-minute job turns into a return trip to the parts counter. Two problems show up after a technically successful install: a beam that points the wrong way, and a dashboard warning that will not clear.
Verifying beam alignment after replacement
Do not assume a seated bulb is an aimed bulb. The retaining clip holds the bulb, but the housing's aim is set independently, and a bulb that is not perfectly flat in its socket will throw the pattern off even if the clip is closed.
- Park on level ground facing a flat wall or garage door, about 25 feet back. Measure the distance, 25 feet is the conventional reference and it matters for the math below.
- Measure the height of each headlight's center from the ground, and mark that height on the wall with tape.
- Turn on the low beams. The top of the flat cutoff on each side should sit slightly below the tape line, roughly 2 to 3 inches below at 25 feet is a common target for a passenger car.
- The cutoff should be flat across the driver side with a slight upward step on the passenger side. That step is intentional and keeps light out of oncoming drivers' eyes.
- If one side is high, low, or rotated, the bulb is not seated flat. Turn the lights off, let them cool, reopen the dust cover, release the clip, and reseat the bulb before touching any adjuster screws.
- Only adjust the housing screws if both bulbs are correctly seated and the pattern is still wrong. Aiming screws are typically a hex or Phillips head on the top and side of the housing; make quarter-turn adjustments and recheck.
Diagnosing a persistent 'Bulb Out' warning
1. Confirm the bulb is actually correct. A standard H7 halogen in the correct wattage should not trigger a warning on a halogen-equipped car. If it does, the problem is downstream.
- Use a CANbus-compatible bulb with a built-in resistor. This is the cleanest option and avoids splicing.
- Add an inline load resistor across the circuit. This works but generates heat, mount it to metal, not to plastic or wiring loom.
- Return to a standard halogen bulb. This is the only option that guarantees no warning and no added heat.
Resetting the warning
On most Passats, the bulb-out warning clears on its own after the ignition is cycled two or three times with a correct bulb installed. If it does not clear after a full drive cycle, the module has stored a hard fault and needs a scan tool to reset. Disconnecting the battery for 10 minutes will clear some stored codes but not all, and it will also reset your clock, radio presets, and window auto-up functions, expect to re-teach those afterward.
Frequently Asked Questions
What type of bulb does a VW Passat use for its headlights?
Most VW Passat models use H7 bulbs for low and high beam, but it varies by year and trim. For example, 2012-2015 Passats often use H7, while some 2016+ models may use H7 or LED. Always check your owner's manual or the old bulb's base to confirm the correct type before buying.
Do I need to remove the headlight assembly to change the bulb?
In many VW Passat models, you can access the bulb from the engine bay without removing the entire headlight assembly. However, some generations require removing the air filter box or washer fluid reservoir for clearance. If you have large hands, removing the assembly may be easier. Check your specific model year for access.
How do I avoid touching the glass of the new bulb?
Always wear clean gloves when handling halogen bulbs. The oils from your skin can create hot spots on the glass, leading to premature failure. If you accidentally touch the glass, clean it with isopropyl alcohol and a lint-free cloth before installing. LED and HID bulbs are less sensitive but still benefit from careful handling.
Why does my dashboard show a 'Bulb Out' warning after replacement?
A 'Bulb Out' warning often appears if the new bulb has different resistance than the original, especially when switching to LED. This can trigger the car's CAN bus system. To fix it, use a CAN bus-compatible LED bulb or install a load resistor. Also, double-check that all connectors are secure and the bulb is fully seated.